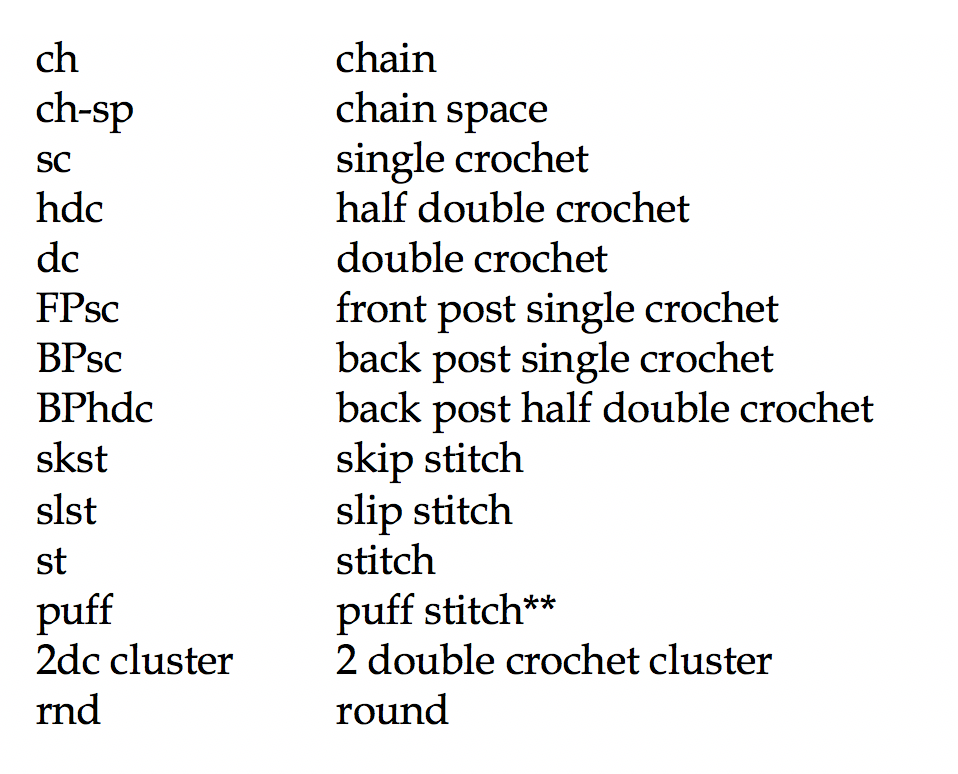
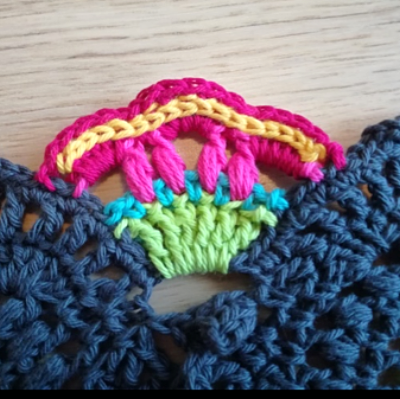
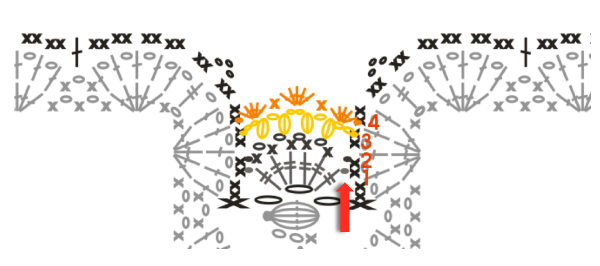
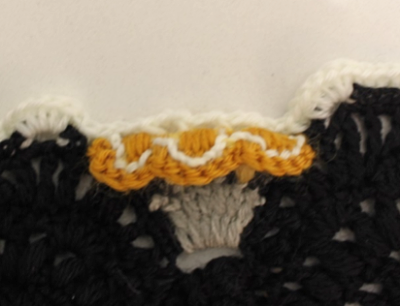
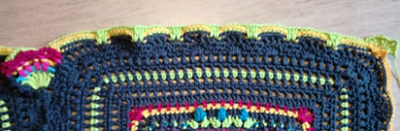
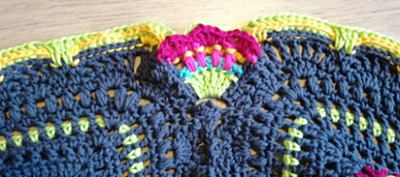
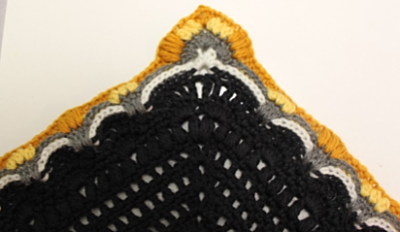
Crocus Border and Passiflora Flowers


#gardenofdreamscal #anceligadesign


This pattern is a part of the Garden of Dreams CAL project.

You need 5 different colors of yarn to make this flower. You can crochet this piece using almost any kind of yarn, but I recommend yarns with a hook recommendation of max 4.5 mm.


COPYRIGHT - This publication is protected by the Copyright Act. It is available to you free of charge. You must not modify or distribute the pattern. Reselling the free pattern in all forms (a whole set of instructions or a single part) is prohibited. Selling a finished product is prohibited unless otherwise agreed with the designer. To download pattern for private use: http://www.anceliga.fi. Sharing the pattern is not allowed.


© 2019 Anne Vierimaa / Anceliga Design, All rights reserved.


Stitches used in this pattern (US terms):

**See stitch instructions from the separate Stitch Tutorial file >> Click Here <<


Crocus border

The 1stround of the Crocus Border is crocheted before making the Passiflora flowers that go in between each square.   

CHOOSE a 0.5 mm SMALLER HOOK THAN THE HOOK YOU USED BEFORE. This way your border will look nicer and not become wavy. Please work quite tightly and if needed, change hook to an even smaller size. Use the same size hook for every rnd of the Crocus Border.


Start with Standing Single Crochet. 

Rnd 1

Using same color as final round of squares 

Starting point is in any corner ch1-sp before the tr. 

2 sc into ch1-sp, ch 3, sk tr, 

*(2 sc into ch1-sp, sk dc) 5 times. Sk sc, dc into ch1-sp, sk (sc, dc). 

[(2 sc into next ch1-sp, sk dc) 4 times. Sk sc, dc into ch1-sp, sk (sc, dc)] 6 times. 

(2 sc into ch1-sp, sk dc) 4 times, **2 sc into ch1-sp, ch 3, sk tr, (2 sc into ch1-sp, sk dc) 4 times, 2 sc into ch1-sp, sc into dc, ch3, sk PC of the Flowers Bud joining part, move to dc of the next flower square  (this is the 1stdc on top of the joining PC). 

Sc into dc, (2 sc into ch1-sp, sk dc) 4 times, 2 sc into ch1-sp, ch 3, sk tr.* 

Repeat *_* completing each side and corners, omitting from ** on final repeat. Join to the 1st sc with slst. Cut yarn and fasten off.


Passiflora

In the next part we will create the Passiflora flowers in the ”hollows” between the flower squares. 

USE SAME HOOK FOR THE PASSIFLORA PART AS USED FOR SQUARES. 

Note that every rnd is worked with a different color yarn and worked into the right side of your blanket. Start and end all rnds with slst into the Crocus Border rnd 1 sc sts.

Rnd 1

Light Gray 

Slst into 4thsc on right side of the Crocus Border ch3-sp, 6 tr into ch3-sp. Join to the 4th sc (left side) of the next flower square with slst.  Cut yarn and fasten off. 

[6 tr]

Rnd 2

Dark Gray 

Slst into sc (on Crocus border) before the 1stslst of the previous rnd. Sc in the 2ndtr, (ch 1, sc in the next tr) 4 times. Join to the sc after the last slst with slst (on Crocus border). Cut yarn and fasten off. 

[5 sc, 4 x ch1-sp]

Rnd 3

Yellow 

Slst into 2ndsc before the 1st slst from previous rnd (on Crocus border). Ch 2, sk sc, puff-mini into ch1-sp, ch 1, sk sc, puff-mini into ch1-sp, ch 2, sk sc, puff-mini into ch1-sp, ch 1, sk sc, puff-mini into ch1-sp, ch 2, sk sc. Join to the 2nd sc after previous rnd last slst, with a slst. Cut yarn and fasten off.  

 [4 puff-mini, 2 x ch1-sp, 3 x ch2-sp]

Rnd 4

Mustard 

Slst in the sc before  1st slst from previous rnd. 5 dc into ch2-sp, sk puff-mini, sc into ch1-sp, sk puff-mini, 5 dc into ch2-sp, sk puff-mini, sc into ch1-sp, sk puff-mini, 5 dc into ch2-sp. Join with slst to the next sc after the last slst from previous rnd. Cut yarn and fasten off. 

[15 dc, 2 sc]

Rnd 5

White 

Note, this is an optional rnd. Work surface slsts into rnd 4 dc and sc sts. Cut yarn and fasten off. 

**This rnd is not marked on the chart. 

[17 surface slst] 

You made it! Your 1st Passiflora is ready.Repeat Passiflora rnds between flower squares. Work 10 Passiflora flowers in total between squares.

Crocus Rnd 1. (black) and Passiflora flower

In the next part we will work the remaining rounds of the Crocus Border.  

Rnd 2

White 

Start in any corner of your blanket in the 1st rnd of Crocus Border corner ch3-sp.  

REMEMBER TO CHOOSE a 0.5 mm SMALLER SIZED HOOK, THE SAME SIZE THAT YOU USED FOR RND 1 OF CROCUS BORDER. 

*[(3 hdc, ch 3, 3 hdc) in the corner ch3-sp,

(BPhdc into every sc, ch 2 and sk all dcs from previous rnd) repeat until you have reached the ch3-sp before the Passiflora flower.  

HINT: There should be 8 BPhdc between every ch2-sps, before and after the ch3-sp there will be 10 BPhdc. 

5 hdc into next ch3-sp, 2 BPhdc  

Work in rnd 3 of Passiflora behind puff-mini sts:(ch 2, BPsc into puff-mini) 4 times, ch 2. 

BPhdc into 2nd st before ch3-sp, BPhdc in the next st, 5 hdc into next ch3-sp, (BPhdc into every sc, ch 2 and sk all dcs from previous rnd) repeat until you reach the ch3-sp before the Passiflora]* Repeat completing all sides and corners. Join to the 1sthdc with slst. Cut yarn and fasten off.

Rnd 3

Gray 

*[(3 dc, ch 3, 3 dc) into corner ch3-sp, sk hdc, 4 dc into next st, sk hdc, BPhdc into next 9 sts, sk BPhdc, 2 dc into right side of sk dc of previous rnd between sc and dc of rnd 1, working over ch-sp of Rnd 2,  2 dc into left side of sk dc of previous rnd between dc and sc, working over ch-sp of rnd 2. Sk BPhdc. 

(BPhdc into next 6 sts, sk BPhdc, 2 dc into right side of sk dc of previous rnd between sc and dc of rnd 1, working over ch-sp of rnd 2. 2 dc into left side of sk dc of previous rnd between dc and sc, working over ch-sp of rnd 2. Sk BPhdc.) 6 times. BPhdc into next 14 sts. Now you are in last st of 5hdc group before Passiflora flower.   

Work behind Passiflora flower into rnd 4 dcs:

(BPsc into 3rddc of 5dc-group rnd 4. Ch 4) 2 times, BPsc into 3rddc of 5dc-group rnd 4. BPhdc into next 14 sts, 1st BPhdc into 1st5hdc-group st. 

Sk BPhdc, 2 dc into right side of sk dc of previous rnd between sc and dc of rnd 1, working over ch-sp of rnd 2. 2 dc into left side of sk dc of previous rnd between dc and sc, working over ch-sp of rnd 2. Sk BPhdc)) repeat across to after last 2 dc-group before the corner, BPhdc into next 9 sts, sk hdc, 4 dc into next st, sk hdc]* Repeat *-* around the blanket. Join to the 1stdc with slst. Cut yarn and fasten off.

Rnd 4

Yellow 

**HINT: Work the 2dc clusters into same st. 

*Sc into corner ch3-sp, ch 1, [(2dc cluster, ch 1) 2 times], 2dc cluster, ch 4, [sk (4 dc, BPhdc)], BPsc in next 7 sts, 

[(sk (BPhdc, dc), (2dc cluster, ch 1)] 2 times, 2dc cluster, sk BPhdc, BPsc into next 4 sts, ch 4, [sk (BPhdc, 4 dc, BPhdc), BPsc into next 4 sts)] 3 times. 

[Sk (BPhdc, dc), (2dc cluster, ch 1)] 2 times, 2dc cluster, sk BPhdc, BPsc into 13 next sts, sk BPsc, 5 sc into ch4-sp, sk BPsc, 5 sc into ch4-sp, BPsc into next 13 sts] repeat until you reach the last 3 x 2dc cluster group,  BPsc into next 7 sts, ch 4, [sk (BPhdc, 4 dc), (2dc cluster, ch 1) 2 times], 2dc cluster, ch1.* Repeat *-* around the blanket. Join to the 1st sc with slst. Cut yarn and fasten off.

Rnd 5

Mustard 

*[(2 hdc, ch 2, sk sc, 2 hdc) into rnd 3 corner ch3-sp, working over Rnd 4 ch=sp, (FPsc into 2dc cluster, sk ch1-sp) 2 times,  

FPsc into 2dc cluster, sk st, puff-mini st into next 3 dcs, working over Rnd 4 ch-sp 

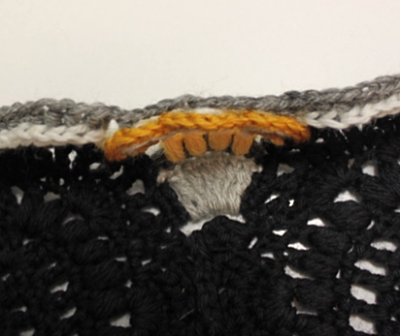
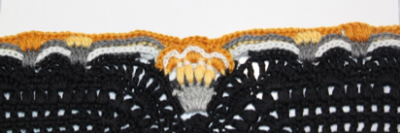
Working into rnd 4. Sk BPsc, hdc into next 6 sts, 

[(FPsc in the 2dc cluster, sk ch1-sp) 2 times,  

FPsc in the 2dc cluster, hdc into next 4 sts, sk st, puff-mini into next 3 dcs from rnd 3, working over Rnd 4 ch-sp 

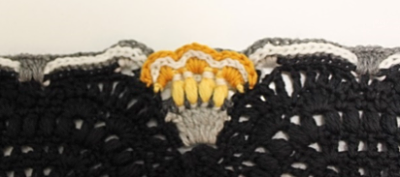
Working into rnd 4, hdc into next 4 sts 3 times,  

(FPsc into 2dc cluster, sk ch1-sp) 2 times, 

FPsc into 2dc cluster, hdc into next 15 sts. 

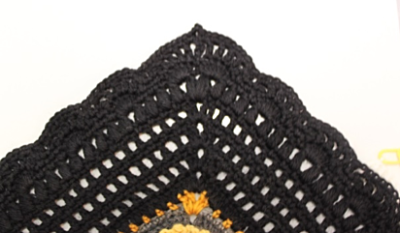
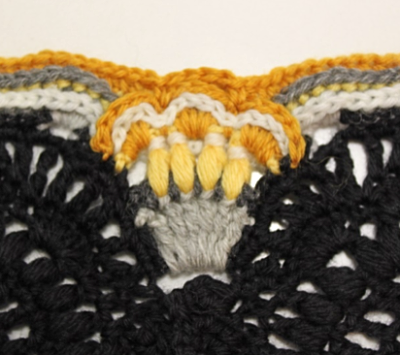
Sc are worked into Rnd 4 of Passiflora,

Sc into 1stsc of rnd 4 of Passiflora, sk st, hdc into next 2 sts,sk BPsc of Rnd 3, hdc into next 2 sts, sk st, Sc into 2nd sc], hdc into next 15 sts, repeat to the last 3 x 2dc cluster group on that side, 

Hdc in next 6 sts, sk st, puff-mini into next 3 dc rnd 3, working over ch4-sp of Rnd 3, (FPsc into 2dc cluster, sk ch1-sp) 2 times,  

FPsc into 2dc cluster.]* Repeat *-* around the blanket. Join to the 1st hdc with slst. Cut yarn and fasten off.  

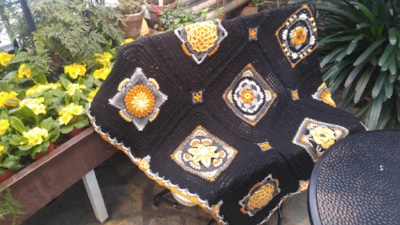
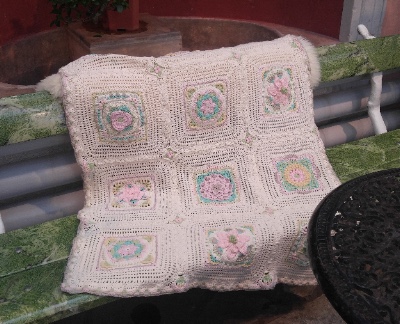
Fasten off and secure ends, block the blanket, wet and let dry.

Yippee! Congratulation, you did it! 

Beautiful work. This was not an easy part to do and you made it! You should be very proud of yourself.


I love designing crochet pieces and this pattern is free for you.

This design is protected under copyright laws, please abide by this. Thank you!  

Your Garden of Dreams is blooming so nicely.


I hope you will show your work to all of us. When you publish pictures on social media, please use the following hashtags so I will be able to see your work:  


#gardenofdreamscal

#anceligadesign

@anceligadesign

and add a link to my site:

www.anceliga.fi


Thank you so much! :)


This CAL has been a wonderful journey. But now it is time to say good bye. I hope you will enjoy my other designs and designs to come. We will meet again. 


Anne Vierimaa 

Anceliga Design