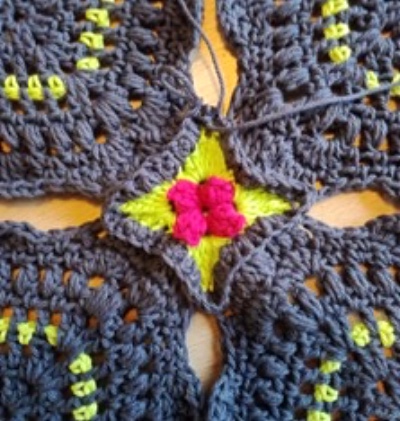
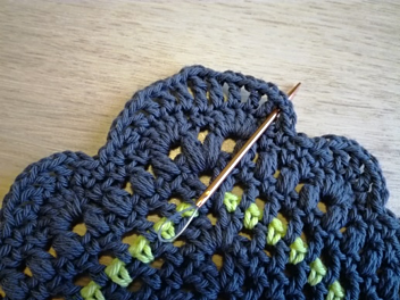
Hortensia Flowers and Flower Buds-joining


#gardenofdreamscal #gardenofdreamscal_joining #anceligadesign


This pattern is a part of the Garden of Dreams CAL project.


You need 2 different colors of yarn for the Hortensia piece. You can crochet this piece using almost any kind of yarn, but I recommend yarns with a hook recommendation size maximum of 4.5 mm.


COPYRIGHT - This publication is protected by the Copyright Act. It is available to you free of charge. You must not modify or distribute the pattern. Reselling the free pattern in all forms (a whole set of instructions or a single part) is prohibited. Selling a finished product is prohibited unless otherwise agreed with the designer. To download pattern for private use: http://www.anceliga.fi. Sharing the pattern is not allowed.


© 2019 Anne Vierimaa / Anceliga Design, All rights reserved.


Stitches used in this pattern (US terms):

**See stitch instructions from the separate Stitch Tutorial file.


Hortensia Flowers

Crochet round 1 stitches into the magic ring.  

Rnd 1

Mustard  

[Ch 3 (counts as 1st dc), 4 dc] work 1st PC from these sts. (Ch 2, PC) 3 times, ch 2. Join to the 1st PC with sl st. Cut yarn and fasten off.

Rnd 2

Gray 

*[SSsc (counts as sc in next repeats), hdc, dc, tr, ch 2, tr, dc, hdc, sc] into ch2-sp, sc into PC.* 4  times. Join to the 1st sc with sl st. Cut yarn and fasten off.

Make 6 Hortensia flower pieces. You will find the stitch symbols in the chart at the end of this document.

Joining Hortensia

First, we will join all the flower squares together with the Hortensia flowers. Start joining in the right bottom part of your work.  

You will see the chart for Joining Order which describes in which order the pieces are to be joined (Please see the photo at the end of this document ). There is also a circled number to follow the order 1-6.

Note that Hortensia pieces and flower squares are numbered in the chart. You will find information for this in the Joining section of this document.  

Tip: You can add numbered labels in your work by making labels using tape and a marker. Arrange all pieces on the floor and number your flower pieces as in the chart on page 7. This makes it easier to follow the numbers.


Joining the 1st Hortensia:


*Place Hortensia piece in hand with wrong side facing up. Work 2 sc into ch2-sp. Set flower square on top of Hortensia with the right side facing up. Hortensia and flower square are now on top of each other, wrong sides facing one another. 

See photos below.


1st joining sc: 

Insert hook through front of the flower square, into 1st ch1-sp and through tr st of Hortensia piece (insert hook from wrong side of Hortensia through to right side of the work) Yarn over, pull yarn through both pieces, yarn over and pull through 2 loops.


Sk dc of the flower square.

2nd joining sc: 

Insert hook into front of flower square through 2nd ch1-sp and through dc of Hortensia piece. Yarn over, pull yarn through both pieces, yarn over and pull through 2 loops. 

Sk dc of flower square.


3rd joining sc: 

Insert hook into front of flower square through 3rd ch1-sp and through hdc of Hortensia piece. Yarn over, pull yarn through both pieces, yarn over and pull through 2 loops 

Sk dc of flower square.


4th joining sc: 

Insert hook into front of flower square through 4th ch1-sp and through sc of Hortensia piece. Yarn over, pull yarn through both pieces, yarn over and pull through 2 loops 

Sk dc of flower square.


5th joining sc: 

Insert hook into front of flower square through 5th ch1-sp and through sc of Hortensia piece. Yarn over, pull yarn through both pieces, yarn over and pull through 2 loops 

Sk tr of flower square.


6th joining sc: 

Insert hook into front of flower square through 6th ch1-sp and through sc of Hortensia piece (This is the same st where the 5th joining sc was already worked). Yarn over, pull yarn through both pieces, yarn over and pull through 2 loops 

Sk dc of flower square.


7th joining sc: 

Insert hook into front of flower square through 7th ch1-sp and through sc of Hortensia piece. Yarn over, pull yarn through both pieces, yarn over and pull through 2 loops 

Sk dc of flower square.


8th joining sc: 

Insert hook into front of flower square through 8th ch1-sp and through hdc of Hortensia piece. Yarn over, pull yarn through both pieces, yarn over and pull through 2 loops 

Sk dc of flower square. 


9th joining sc: 

Insert hook into front of flower square through 9th ch1-sp and through dc of Hortensia piece. Yarn over, pull yarn through both pieces, yarn over and pull through 2 loops 

Sk dc of flower square.


10th joining sc: 

Insert hook into front of flower square through 10th ch1-sp and through tr of Hortensia piece (Insert hook through wrong side of the Hortensia into right side). Yarn over, pull yarn through both pieces, yarn over and pull through 2 loops

Sk dc of flower square.

2sc into ch2-sp of Hortensia piece (from wrong side of Hortensia piece). 

Joining the 2nd flower square: Poppy. 

Repeat joining scs 1-10 and 1 sc into ch2-sp of Hortensia piece.

Right side

Wrong side

Joining the 3rd flower square: Anemone. 

Repeat joining scs 1-10 and work 2 sc into ch2-sp of Hortensia.  

Joining the 4th flower square: Pansy 

Sl st into 1st sc of Hortensia*


**All 4 Flower squares are joined onto the Hortensia piece.

Joining the 2nd Hortensia: 

Repeat *-* joining sts for these flower squares in the following order. 

2. Poppy 

5. Peony 

6. Lily 

3. Anemone


Joining the 3rd Hortensia: 

Repeat *-* joining sts for these flower squares in the following order. 

4. Pansy 

3. Anemone 

7. Peony (2) 

8. Poppy (2)


Joining the 4th Hortensia: 

Repeat *-* joining sts and these flower squares in the following order. 

3. Anemone 

6. Lily 

9. Dahlia (2) 

7. Peony (2)


Joining the 5th Hortensia: 

Repeat *-* joining sts and these flower squares in the following order.  

8. Poppy (2) 

7. Peony 

10.  Lily (2) 

11. Anemone (2)


Joining the 6th Hortensia: 

Repeat *-* joining sts and these flower squares in the following order. 

7. Peony (2) 

9. Dahlia (2) 

12.  Pansy (2) 

10. Lily (2)


Flower Buds joining

Joining order is marked with red arrows and numbers in the joining chart.

Place your work right side facing up.  

Cut yarn after every flower square. You work 1 flower square side at a time. In the Joining Chart, the Flower Buds Joining are written in green sts. 

Joining: 

HINT: Crochet into lower flower square if not otherwise mentioned.

HINT: ALL stitches will be worked in ch1-sps. 

RIGHT SIDE JOINS: 

Starting with SS SPC in the first ch1-sp between 2sc after 5dc group corner, 

*SPC into ch1-sp of lower piece and finishing in the same “point” in upper piece ch1-sp, ch2, sk dc, sc in ch1-sp, ch 1, (sc in the next ch1-sp through both upper and lower pieces, ch 1) 2 times, sc in next ch1-sp, ch2* 6 times, SPC in next ch1-sp, ch 2, sc in next ch1-sp, ch 2, sl st in upper ch1-sp.**Work all joins on right side of blanket first, following order in the RED arrow diagram. 

CENTER JOINS: 

**The center joins are worked between the Hortensia Flower pieces. 

Sl st into 1st upper ch1-sp of 5dc group, ch 2, sc in lower ch1-sp, ch 2, repeat from * of RIGHT SIDE JOIN instruction as written above.

LEFT SIDE JOINS: 

Left side joins are worked from Hortensia piece to the last ch1-sp before the 5dc group as center instructions finishing with SPC as final stitch.

**Work all LEFT SIDE JOINS as directed for the RED ARROW Joining Diagram.

Note that in the chart the bigger X (sc) symbol means that you work the sc through both pieces and the square.  

Cut yarn and fasten off after each join section/seam. Please note that on the left side (outer edge) of your work the last st is SPC. 

Be careful that you always work from right to left as pointed out in joining order chart on page 7, points 1-3. 

When you are joining lines 4 and 5, rotate work so joining points are on the right side. This way joining seams will look uniform and nice.

Click "Download PDF" to open the Flower buds joining chart


Joining Order Chart

Special Stitches

SPC = special popcorn stitch

5 dc into same stitch, remove hook from working loop.  Insert

hook into top of 1st dc of 5dc group from the top. Replace the loop from the top of the 5th dc onto hook and pull through. Insert hook into ch (upper flower piece), yarn over, pull through all stitches. Popcorn stitch is now joined with the upper flower square.


Fasten off and secure ends, block now or after next part of the blanket, wet and let dry.


How difficult was that? You needed to turn your work around a lot. I hope you are proud of yourself, it wasn’t an easy job. 

One more part and your Garden of Dreams blanket is ready.


COPYRIGHT - This publication is protected by the Copyright Act. It is available to you free of charge. You must not modify or distribute the pattern. Reselling the free pattern in all forms (a whole set of instructions or a single part) is prohibited. Selling a finished product is prohibited unless otherwise agreed with the designer. To download pattern for private use: http://www.anceliga.fi. Sharing the pattern is not allowed.


© 2019 Anne Vierimaa / Anceliga Design, All rights reserved.